Monday, October 1, 2012

Foodie Penpal Reveal

The Lean Green Bean

It's reveal day-- yay!!  My package came from Marie, an avid food blog reader.  Her package arrived to me at the PERFECT time. I have been unbelievably stressed recently, and I haven't had time to really eat properly.  Her package came, I opened it, and I took out a couple things for dinner and lunch the next day almost immediately.  

I forgot to take a picture of the package when it first arrived, but here it everything except the already cooked quinoa (excellent lunch!).


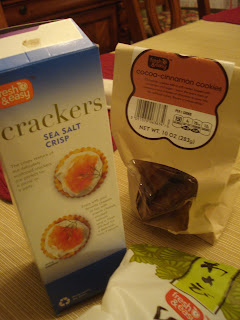
Here's a picture of the other goodies that I already ate :)  Notice the half empty cookie bag and empty cracker box... (at least I remembered to keep the box to take a picture)


I have never tried wasabi puffs, but I'm really excited.


Thanks Marie for this AMAZING Foodie Penpal box!

Saturday, September 29, 2012

Meatloaf Parm Cups

One of my favorite fall foods is meatloaf.  It just screams back-to-school family dinner to me.  My biggest problem with meatloaf is that I have no portion control.  Enter:  the muffin tin.  It's a cute way to present your food but also really helps with portion control!

I adapted my recipe from Emily Bites-- her recipe was Chicken Parm Meatloaf, but I kept the flavor profile the same and used ground beef instead of chicken. Two meatloaf muffins was perfect for me; three for Austin.

Meatloaf Parmesan Cups


Ingredients
1 ½ lbs raw ground beef
2 large egg
6 Tbs dried breadcrumbs
1 tsp dried basil
¾ tsp dried thyme
¾ tsp oregano
3 garlic cloves, minced
1 red onion, chopped
¾ tsp salt
1 tsp black pepper
¾ cup Parmesan cheese
¾ cup pasta sauce
¾ cup reduced fat shredded Mozzarella cheese

Directions

Pre-heat the oven to 350.  Spray muffin tin with cooking spray.  In a bowl, combine ground beef, eggs, breadcrumbs, basil, thyme, oregano, garlic, onion, salt, pepper, and Parmesan cheese.  Mix together-- using your hands is the best way.
Form the meat mixture evenly into the 12 cups of your prepared muffin tin.  Use spoon to make little bowl in the meat mixture to cup the pasta sauce. Spread the pasta sauce evenly over the tops of each muffin. Bake for 20 minutes and remove from the oven. Top each muffin with about a Tbs of shredded cheese and return to the oven for 2-3 minutes until the cheese is melted.


Thursday, September 27, 2012

Peanut Butter Frosting

When I posted last week with the Peanut Butter Nutella Cookies, I told you all about the great dipping sauce/frosting that I used.  What really happened is that I had leftover frosting from the cupcakes below and decided to use it with the peanut butter cookies.  It was genius!  (if I do say so myself)

With the cupcakes, I am all about semi-homemade.  I used a boxed cake mix, added chocolate chips, and then made the peanut butter frosting from scratch.

The frosting recipe is from an amazing woman I used to work with.  She would make a chocolate cake with peanut butter frosting for everyone's last day (we had one colleague who faked several last days to get more cakes-lol).

Here's the best peanut frosting I have ever had:

Peanut Butter Frosting


Ingredients
1/2 cup peanut butter
1 lb. 10x sugar (powdered sugar)
7-8 tbs milk
1 tsp vanilla

Directions
Blend sugar and peanut butter.  Alternatively, add sugar and milk.  Add vanilla and beat until smooth.

Tuesday, September 25, 2012

Green Leaf's and a Giveaway


I have been a little MIA lately because travel season has begun in the wonderful world of Admissions!  I really do love traveling for work-- seeing new places, catching up with friends-- but the thing I hate is how I can't eat healthy.  Well, I guess I can, but it's so hard on the road, especially in airports.

Some of the airports I frequent most are the DC/Dulles and Philly airports for layovers, and I am always looking for a good place to eat.  Recently, I found one-- both good and healthy!  Maybe I can keep up with my weight loss goals while traveling on the road this fall :)

My favorite are the pick and mix salads, so I can get exactly what I want on my salad!  I also love the Chicken Margarita panini and Balsamic Chicken & Peppers wrap.

Next time you're stuck in an airport or traveling around the northeast (most of their shops are in NJ and NY), be sure to try out Green Leaf's!!

Now for the GIVEAWAY-  Want to win a Vitamix Blender?
Here's how--
Visit Green Leaf's Facebook page and like them for an entry, and then click on "Win a Vitamix."
 Super easy-- you should do it right now :)


This sponsorship is brought to you by Green Leaf's who we have partnered with for this promotion.

Friday, September 21, 2012

Jerk Chicken

What is better than cooking over an open flame?  Nothing.  Seriously, if we could grill out everyday, I would.  Actually, we should.

Growing up in Buffalo, NY, my mom still had the grill going in the dead of winter when she was making steaks :) Rule #78:  No excuses, play like a champion.

My mom doesn't mess around.  I get that trait from her, but then make Austin grill in crazy weather.  We're still newlyweds, so he'll do that kind of stuff for me...at least for now :)

About a month ago, we went tubing for the day and camped.  The idea was to go tent camping, but after a day on the river in the rain and arriving to a flooded campsite, we opted for a cabin.

The cabin was heaven, and it's so cute looking too!! 
It was dry in the cabin, but we still cooked an epic meal in the rain.  Grilled chicken, corn, and vegetable packets.  The chicken marinated overnight in a great recipe I found and adapted from Epicurous.

Jerk Chicken Marinade


Ingredients
1 onion, chopped
1 jalapeno pepper, seeded and minced (4-5 pepper rings)
3/4 cup soy sauce
1/2 cup white vinegar
1/4 cup vegetable oil
2 tbs brown sugar
1/2 tbs dried thyme
1/2 tsp ground cloves
1/2 tsp ground nutmeg
1/2 tsp ground allspice
5-6 skinless, boneless chicken breast halves

Directions
In a food processor or blender, combine the onion, jalapeno pepper, soy sauce, vinegar, vegetable oil, brown sugar, thyme, cloves, nutmeg and allspice. Marinate overnight in gallon-sized ziploc bags.

Cook chicken on the prepared grill, until juices run clear.  We had a grilling basket that made it easy to cook the chicken on the camp grill.


Thanks to the most amazing grill masters, who took on the rain for to cook this great meal! 


Wednesday, September 19, 2012

Peanut Butter Nutella Swirl Cookies

In my last Foodie Penpal exchange, the Barefoot Baker gave me some of her favorites from when she studied abroad.  One of those tasty treats was nutella, which is Austin's favorite thing in every country :)

My favorite thing:  peanut butter!  I can eat it with a spoon, on pretzels, well, on almost anything.  Since I'm a good wife, I thought I would combine our two loves!  Enter Peanut Butter Nutella Swirl Cookies!  I made the recipe as described, but I did use the best peanut butter ever:  Once Again Nut Butter.  Check out this peanut butter and see if it's a store near you-- organic, delicious, and you'll be supporting the company my cousin works for.

Also, make these cookies- they are great!

Peanut Butter Nutella Swirl Cookies


Ingredients
1 cup creamy peanut butter
1/2 cup sugar
1/2 cup brown sugar
1 tsp baking soda
1/2 tsp vanilla
1 egg
1/3 cup Nutella
1/4 cup sugar, for dipping

Directions
Preheat oven to 350 degrees. In a large bowl combine all of the ingredients except the Nutella.  Stir until everything is well combined.  Add the Nutella, and stir gently.  You want to incorporate it into the dough, but leave a definite swirl.

Scoop 1 inch balls of dough, and place on a cookie sheet.  Dip fork in the sugar, and gently press down on the balls of dough to create the cross marks.  Bake for 10 -12 minutes.  Cool slightly on the cookie sheet for a couple minutes before removing to a wire rack.

P.S. I made a peanut butter frosting to dip these cookies in that was the perfect addition- stayed tuned for that recipe!!!

Monday, September 17, 2012

Garden Chili

We had a pot-luck at Weight Watchers last week, and I was at a loss of what to bring--something healthy but tasty and easy to make.  I was at a loss of what to bring-- I could do the healthy and tasty but was a little short on time.  I was going to make my trusty stand-by:  ants on a log :) but then realized I could bring what I made for dinner the night before.

It was perfect!  People raved over this chili I adapted from A Spicy Perspective.  They loved it so much they shamed me when I forgot to bring the recipe the next week.  So here it is-- on the blog and in their inboxes.  I hope you enjoy it as much as they do.  It is super tasty (and vegan to boot)!


Garden Chili


Ingredients

  • 1 Tbs. Olive oil
  • 1 large onion, peeled and chopped
  • 4 cloves garlic, peeled and minced
  • 1 spicy pepper, seeded and chopped
  • 3 stalks celery, diced
  • 2 large sweet potatoes, peeled and chopped
  • 3 ears corn, shucked and cut off the cob
  • 2 Tbs. cornmeal
  • 15 oz. cans cannellini (white) beans, drained
  • 15 oz. cans kidney (red) beans, drained
  • 2 – 15 oz. cans diced tomatoes
  • 2 cups vegetable broth
  • 1 cup water
  • 1 1/2 Tbs. ground cumin
  • 2 Tbs. chile powder
  • 2 tsp. salt
  • Black pepper to taste 

Instructions
1. Add the oil to a large pot and set over medium-high heat.
2. Add the onion and garlic and saute for 5 minutes.
3. Add the peppers, sweet potatoes, corn, celery, and cornmeal. Stir and saute another 8-10 minutes.
4. Add all the remaining ingredients and stir well.
5. Cover, lower the heat, and simmer for approximately 20 minutes, until the sweet potatoes are soft.

Prep time: 20 minutes
Cooking time: 35 minutes

Number of servings 8
6 WW P+ a serving **to reduce points, substitute black beans for kidney beans, now 5 points a serving